
I got to build and launch my very first rocket!
I got to experience mentoring this holiday on the BinarX Holiday Program which was something that was new to me. On the program with the BinarX team middle school students will be guided to design, construct, and launch your very own space themed electronics project (payload) in a 3D-printed payload bay within your own personalised model rocket.
I wrote about the day to day itinerary we had and all our milestones in my blog: https://ahlaka.com/binar-holiday-program/.
In this blog I’m gonna talk about my personal rocket, which I got to build along side the kids and its customization.
Rocket Structure Assembly
We were building the Green Eggs rocket model which had very detailed, set of instructions. We did the construction over the span of the 4 days, but we were closely sticking to the instruction manual provided.
We did have the opportunity to 3D print a custom nose cone. It important to remember, Green Eggs’s intended payload was ‘regular-sized raw eggs’ not sensors (which are what we are flying).
On day one, we got to assemble the rocket’s body and fin.
My Rocket Design
I was drawing a blank on what my rocket should look like, so I went home and did some brainstorming.
That night I was reading through the library book I had borrowed from City Library. Once Upon a Time in Space is a BBC book written by Emmy and BAFTA-winning filmmaker James Bluemel. It is based on the documentary of the same name that explored the journey of humans in space.
The book had a chapter on The Space Shuttle, a partially reusable low Earth orbital spacecraft system operated by NASA from 1981 to 2011. I got to read about its development, missions and the astronauts. The concept of launching like a rocket, and gliding back to land like an airplane fascinated me.
I was also drawn to its design, as a lot of thought went into making it lower-cost per flight, reducing its environmental impact, and minimising developmental risk. The Space Shuttle had a winged orbiter with three liquid-fuel engines, a large expendable external tank that held liquid propellant for these engines, and two reusable solid rocket boosters.
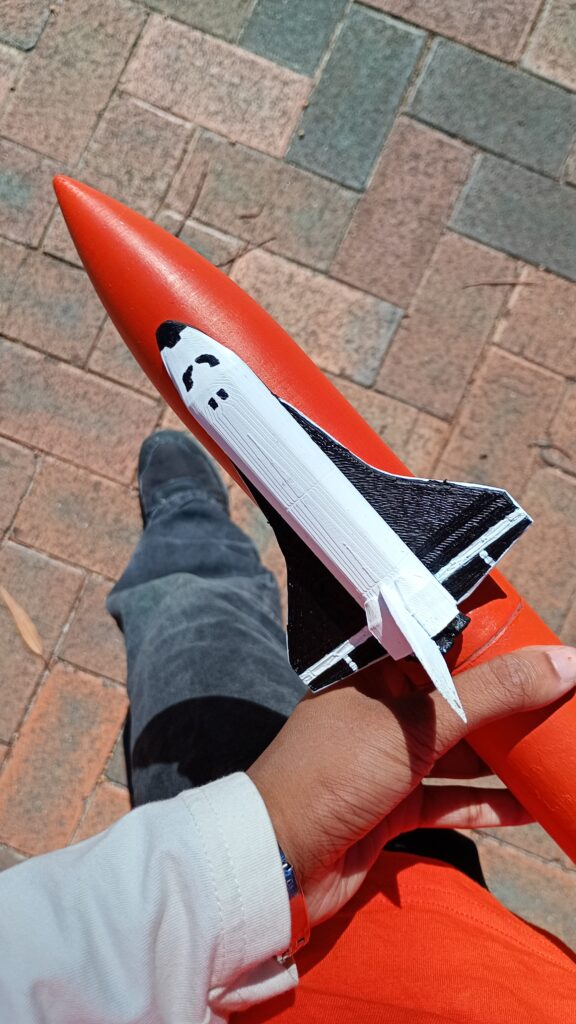
This was the design I decided to try out in my rocket!
Spray-painting
Before, everyone’s rockets looked the same as it was just a basic construction. But, after Day 3’s spray painting each one was very unique and they certainly looked eye catching.
I wanted to paint the body orange, but unfortunately we didn’t have the right spray paint so I added a mix of red and gold to create a dark orangey coating. It wasn’t what i had pictured but I was hoping that the 3D printed Space Shuttle will make it look good.
3D Printing
I had to move onto 3D printing my Space Shuttle. The plan was to 3D a Space Shuttle and attach it to the body. I used Thingyverse to download a one piece print.
Meg had shared a CAD file of the nose cone and they were told to download any 3D printed file from online websites, Printables and Thingiverse. After selecting what to print, we move it onto TikerCAD and place it roughly were we want near the nosecones vertically so that we can figure out the rough placement.
Soldering
For my sensors, I got to solder all three: Magnetometer, IMU, and Pressure sensor onto my board. I soldered the surface mount chips (SMD) to a through hole layout so that it is easy to assemble with the board. The board was then to be placed on the custom 3D printed nose cone of the rocket. Special shout out to Rayaan Atif and Dr Robert Howie for designing the board layout.
We set up soldering stations at Engineering Pavilion (building 215) where we could help students solder their boards. I also soldered my own board and I got lots of help from engineering student mentors at Curtin especially when I had to use the solder sucker (vacuum pump) to pull out the excess.
I was grateful for my engineering and product design classes at my school, that helped me learn how to solder.
Customization
I had given the CAD files to Meg who printed it out, in two parts so help preserve the details which I was very grateful about. This is were I made a blunter: I had forgotten the shape of the shuttle and accidentally ripped of the surface of one of the wings mistaking it for supports. It was only after I had ripped half of the smooth surface did I realize. But I was thinking of painting details onto the rocket so I added the wings as black instead of the original white, to mask my mistake.
As for the rocket’s body, I was not happy with the colour, luckily Meg had bought acrylic paint for us to use which had orange. So I set off coating another layer of bright orange on top of the old spraypaint.
I was very happy with this version as it perfectly matched my BinarX tshirt.