

“You could build (and launch) a rocket in the program, but are you interested in mentoring?”
It was the long awaited school holidays that marked the end of my Year 10. However, nothing much was planned for those few weeks… until I discovered something that would earn me major bragging rights when I returned to school.
Occasionally scrolling through the Binar website, (a regular habit of mine after joining the BinarX Student Payload Program) I found the words: ON EARTH – THE BINARX SCHOOL HOLIDAY PROGRAM pasted on the front page. It looked intriguing and after further research I discovered that it was a call for students to join the BinarX team to make their very own rocket to launch! We could design, construct, and launch our very own payloads in a 3D printed payload bay within our own personalized model rocket.
Being excited I registered for the workshop and waited for a notification but instead I got a very nice email from Meg Berry who is the BinarX Development Manager. And I was invited to volunteer as a peer mentor for the 6 day program instead!
It seemed rather scary to mentor the year 5 and 6s but I was assured that all the BinarX knowledge I gained in the past 3 years were more than enough to help. I also got to attend a preview of the program on Friday the 23rd, where I was given an office tour and briefed on the details of the program.
Preview Day – 23rd Jan
This was my first time visiting the Binar Office where I got to see the team work towards the launch for payloads 5-6-7. I got a tour of the Curtin Science and Engineering Building and also the rooms where we will host the program. I also got to tag along with them for their morning coffee and got to talk with the team and also meet fellow BinarX alumni who was also mentoring.
Then we got straight to work by sorting out all the materials needed for the students to use through the whole week. It included a ‘Space Book’ electronic components, rocket making kit, stationary, nametags, and bright, colorful t-shirts!
It was great to set up the place and also meet everyone before the start of the program and I went home very excited.
Day One – 27th Jan
Introductions
It was my first ever experience mentoring and I was very nervous as I saw the class of kids enter the building. They looked excited and curious which mirrored my feelings.
The start of the programming was helping them find the right sized t-shirts and doing introductions. Everyone went around the room and introduced themselves and it was also my first time meeting the fellow mentors from PAST (Perth Aerospace Student Team) Indi Malinton and Andrew Wallace. It was nice to meet university students studying Mechatronics and Computer Science pathways. I was also laser focused to complete my personal mission of remembering all the students name.
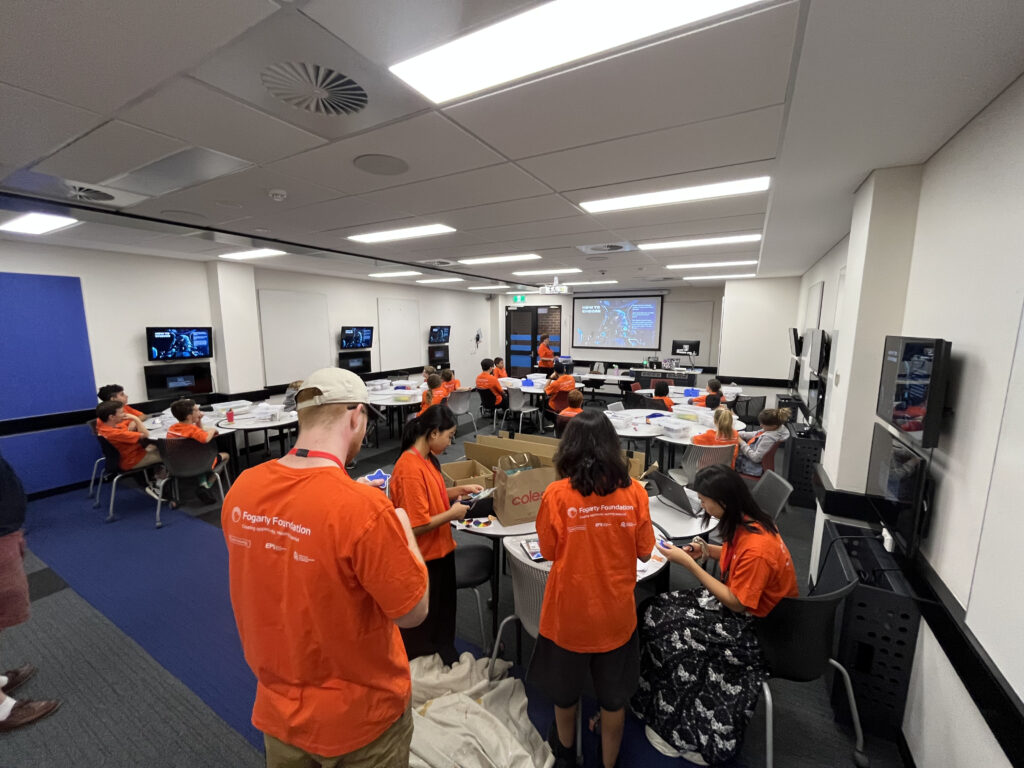
Then we stationed our mentor HQ at a table at the back of the room where we could monitor the class and station the resources. Our first task of the day was an important mission – cutting out laminated stars for lanyards. It would act as an indicator for break time for the kids after they finished their work or if they wanted a chill out time. We even had a station filled with LEGO to play.
Sessions on Sensors and Electronics

Our first class was tackling ‘Science Questions’ with Dr. Eriita Jones exploring acceleration, rotation and orientation. We were introduced to the candidates: IMU, Pressure sensor and Magnetometer so that the students can think about which of these to use for their payload in their rockets.

The kids also got an ‘Introduction to Electronics’ presented by Dr. Robert Howie where he explained what electricity is and current flow.
These presentations where in bite sized pieces for kids to learn about the fundamentals and it was educative even for me.
My Learnings
- Gyroscope: measures rotational movement by detection changes in angular velocity.
- IMU (Inertial Measurement Units): This combines different sensors like the accelerometer and gyroscope to track overall movement.
- Pressure Sensor: The changes in pressure (force) causes changes to the silicon structure which is measured in capacitance or resistance charged in the electronic circuits.
- Magnetometer: Detects the voltage created by electrons from movement through a magnetic field.
- The main stages of a rocket flight are: ignition, boost (rocket accelerates upwards under thrust), coast (the fuel has burned out, but rocket continues upwards due to momentum), apogee (highest point of the flight), parachute, descent, freefall (if the parachute has not yet fully opened, or after separation before deployment, the rocket briefly falls freely) and landing.
Break Activities

As fun break activities there were space themes tattoo stickers that were stationed outside by Eriita. Needless to say we had more fun with that than the kids. But what they really enjoyed was the spontaneous water gun fight where Meg supplied them with Water Squirter Guns. It was lots of fun and we did encounter ambush at every turn.

This day was more introductory as we were gonna start building from day two. Overall it felt really nice to help the student while they got stuck with any problems and make new friends. I got to connect with Curtin University students on their pathways as well as talk with primary school kids.
Day Two – 28th Jan
Building the rocket
Kickstarted day two with some arts and craft by starting the construction of the rocket to launch. We were building the Green Eggs rocket model which had very detailed, confusing set of instructions. Now realistically it would have only taken a few hours to build but we had two major obstacles to work with:
- Customizing: The plan was to 3D print a custom nose cone (more on this later). Keep in mind Green Eggs’s intended payload was ‘regular-sized raw eggs’ not sensors.
- A classroom of 20, 10-11 year olds
And that’s the fun of it, building and tinkering together. This was also my first time doing these activities and I also had to ask mentors for help, while helping. We finished making the body of the rocket (minus nose cone) by the end of the day, and we had a table filled with rooted rockets.

Meteorite talk with Mia Walker
While waiting for the glue to dry we heard from Space Science and Technology Centre (SSTC) Manager, Mia Walker on her story about meteorite hunting in the Australian Outback.
She showed us a video of her discovering a fallen meteorite on Wheatbelt region of WA, into the remote salt flats of Lake Hope, 530km east of Perth. It had fallen from space on Mother’s Day (May 10th), and using Curtin University’s Desert Fireball Network‘s (DFN) cameras they calculated where the meteorite crash landed.
What was also cool was that she bought the meteorite for use to see and touch! It was an amazing opportunity to hold something that fell from space in my hands. Mia also explained what the Space Science and Technology Centre Manager of Curtin University is and it was insightful to hear about the opportunities to study space science in uni.

Soldering
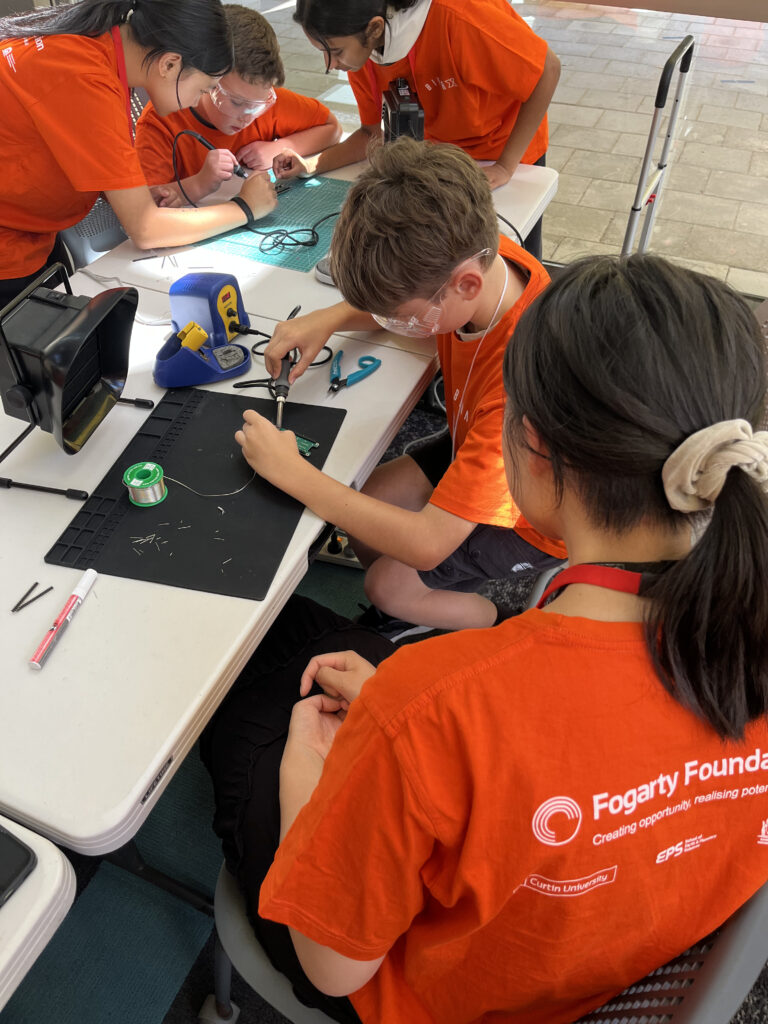
We ended the day with helping kids solder their surface mount chips (SMD) to a through hole layout so that it is easy to assemble with the board. The board was then to be placed on the custom 3D printed nose cone of the rocket. Special shout out to Rayaan Atif and Dr Robert Howie for designing the board layout.


We set up a few soldering stations on the Engineering Pavilion (building 215) where we could help students solder their boards themselves. It was a good opportunity for the kids to do some hands on soldering with guiding from us mentors. They looked excited and was definitely having fun soldering. We spent the whole evening helping them and ended the day with lots of smiles and no casualties (phew).
My learnings:
- Meteoroid vs Asteroid: An asteroid is a small rocky object that orbits the Sun. And when a small piece of an asteroid or comet, called a meteoroid, burns up upon entering Earth’s atmosphere it is called a meteoroid.
- SMD (Surface Mount Device) Chip: An electrical component in which the electrical components are mounted directly onto the surface of a printed circuit board (PCB).
- How does the rocket ignite? It uses an electric igniter which is placed inside the model rocket motor. When the launch button is pressed, the igniter heats up and ignites the propellent (gun powder) inside, producing hot gases that send the rocket into the air.
- How does the parachute get deployed? After the gun powder has finished burning, the model’s built in delay fuse burns for around three seconds before igniting a small ejection charge. This ejection charge pushes off the nose cone and deploys the parachute, allowing the rocket to descend back to the ground.
Important Info:
The magnetometer, IMU and pressure sensors used for this rocket are listed below. They were soldered onto the boards by the kids depending on which sensor they chose for their payload (what they wanted to measure).
- MMC5983MA – Magnetic field sensor for measuring orientation of the rocket
- ICM-42670 IMU – Inertial Measurement Unit for measuring acceleration and rotation
- BMP390 – Pressure sensor to measure changes in air pressure
Day 3 – 29 Jan
Spray painted rocket base
We all came back in the morning to freshly painted rockets which were spray painted by Dr Howie last evening. In their Space Books, the kids had drawn their vision of how the final rocket would look like. They could have a base paint and can be further customized by adding 3D printed trinkets and further details.

3D Modelling
We moved straight on to 3D modelling using TinkerCAD 3D modelling program. It is a free and beginner friendly platform for creating 3D designs. I was introduced to it in year 7 and 8 in school, so it was their first time trying it out.
Meg had shared a CAD file of the nose cone and they were told to download any 3D printed file from online websites, Printables and Thingiverse. After selecting what to print, we move it onto TikerCAD and place it roughly were we want near the nosecones vertically so that we can figure out the rough placement.
It was hard to help kids do this step as it was a new tool they were looking at. They were also given iPads to use which felt harder to work in compared to laptops. But we got there, and I saw so many unique ideas which I couldn’t wait to see printed out.
Painting and Sanding
While waiting for the 3D prints to finish, we decided to paint on any details for the rockets and also paint the nose cone. There was a station set up outside the Engineering Pavilion (building 215) filled with paints, paint brushes, markers, and glitter. They could add details to the body of the rocket to make it look really pretty. Bu before they could paint the nosecone they had to do some sanding.

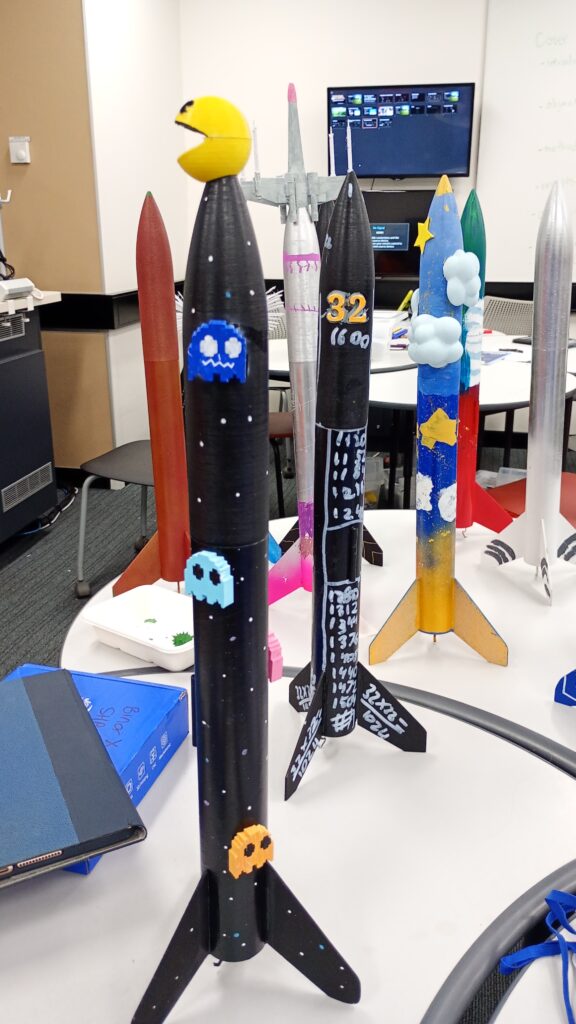
They were all good at this part as they let their creativity take over and I heard some pretty good ideas of themes like spaceship, Pacman and even math.
Day 4 – 30 Jan
Painting took up the rest of yesterday but we were still not done with it as all our 3D prints were done overnight by Meg. They came put of the printer needing some sanding and painting.

Making Presentations
But something new that they tried was forming groups and creating a presentation showing off their projects they did in this one week. This was to be done in Canva, a tool widely introduced and used in middle school. The Australian software tool has templates to create a wide range of presentation decks.
They spent so much time and effort taking videos, photos and adding information to their slides.
I also found the team names they came up with quite cheeky:

Final Rocket Checks
After lunch we were at the last step of assembling the rockets, this included installing the shock cord, attaching the parachute, and preparing the engine.
This part felt more stressful than I imagined, probably as it was a battle between learning the tricks and passing what I learn to the kids. I also made a mental note to read and familiarize myself with the instruction manual before classes for the next time. Thankfully Meg and Dr Howie guided us along the steps.
My Learnings
Shock Cord
The shock cord was a strong elastic that connected the nose cone (and parachute) to the main body of the rocket.
The kit included a trip of paper with instruction labelled on where to glue and attach the elastic. I presume the paper (with elastic shock cord) is much easier to glue to the rocket’s inside body than just the string.
Why use a Shock Cord?
When in the air, the nose cone is pushed off due to the ejection charges, which pulls the parachute out. The shock cord is an important feature of the rocket because it keep the nose cone attached to the rocket (as it is an elastic band). So it’s to make sure your nose cone (with your payload containing valuable data) does not fly away, to forever be lost. This way, you can retrieve your data and also reassemble your rocket after launch.
The Parachute
The parachute is another safety feature that helps the rocket descend safely back to ground. Without one the results would be a dismembered rocket.
A knot is tied at the ends and it is carefully folded and packed inside the rocket’s body. It’s stuffed near the nose cone so that when it come off, the parachute is released. Making sure the parachute is folded neatly is an important step as otherwise the parachute may not open in time while on the air.
Recovery System (Wadding)
This was my first time hearing the term ‘recovery wadding’, it is used to describe the flame resistant material used in model rocketry. The wadding for this rocket came in the form of sheets of paper that were crumpled up into balls and stuffed inside.
Why use a recovery wadding?
When the rocket reaches its highest point, the motor’s ejection charge produces a burst of hot gas that pushes the nose cone and parachute out of the rocket. Without any recovery wadding the hot gases could melt or burn the plastic parachute. This poses a risk of the parachute not being deployed properly or at the right time.
These three features are thus important to make sure the rocket works and we get the payload’s data at the end of the day.
Installing the sensors
Another important step was to actually attach the board with the sensors to the rocket. This is where the customization happened (besides the exterior accessories), the team had 3D printed custom nose cones that fit with the Green Eggs rocket body. The reason for this customization was that so we could place the board inside tight and secured.
We placed the board with the SanDisk Ultra 32 GB card, ready for flight.
We ended the day late as we all had some finishing touches to do and also clean up the rooms ready to welcome the parents tomorrow.
Day 5 – 31 Jan
The last day of the program and the most important. The day called for an early start as the launch was scheduled to start at 7:00 AM. This was due to the strict timeline given by Airservices Australia in the form of an air safety approval to launch rockets from 7:00 to 9:00 AM.
I was instructed by Meg to meet the parents at Curtin’s Edinburgh Oval, so that they can be briefed about the procedures and also given a warm welcome.
Striving to be a very punctual mentor, I reached Curtin almost 45 minutes early and had time to walk around the university. The campus is beautiful and I have been here for other events including, PECAN+ Capture The Flag and RE_B00TCMP and well as for BinarX’s student payload presentation days. The university is named in honor of John Curtin who became Australia’s fourteenth prime minister in 1941.
Back at the oval at 7:00, Meg did a welcome to the country and briefed us of the basic safety measures: only mentors and students with their rockets are allowed onto the ground. The onlookers were strictly told to stay a few meters away especially since we cannot predict where the rocket will fall, even with a parachute.
Rocket Launching
I also had to remember important steps so that we could have a smooth rocket launching sessions and also ensure that everyone’s rockets could go up in the air.
Launch Station
The team had already set up a launching area with the three main components (sold separately from the rocket kit). This was the launch pad, and launch controller.
- The Launch Pad is the base that sits on the ground as a stable platform for launching rockets. The Green Eggs pad came with a sturdy base, an adjustable launch rod, and a blast deflector that protects the pad from the rocket’s hot exhaust.
- The Launch Controller is a safety feature that allows the the rocket to be ignited from a distance. It is connected to the launch pad by a 5.2 m cable and has a safety key, to prevent accidental launches, an LED indicator that confirms the igniter is connected correctly, and a launch button. When the button is pressed, an electric current flows through the igniter inside the rocket motor, igniting the propellant and launching the rocket safely into the air.
Pre-Launch
After setting up the launch pad we were starting to launch as Dr Howie inserted the SSD card into the board, so we could have the data from the sensors which could be mapped after launch. The GoPro camera was also strapped to the rocket’s body.
Ignition and Liftoff
Then it was my turn, and I made a mental checklist on all the steps that I needed to complete to let this work:
- Accompany one student (no parents) with the rocket to the launch ground.
- Wear safety glasses before attaching the rocket to the mount.
- Place the rocket onto the launch rod, this was done by sliding the rod through the small straw tube we had attached to the body of the rocket on Day 4’s assembly.
- Ensuring the rocket can slide freely and is pointing vertically.
- Turn on the camera so we can some cool footage to view.
- Connect the igniter clips from the launch controller to the igniter wires on the rocket motor. It needs to be clipped properly and not touching each other.
- Move everyone to a safe distance from the launch pad and be near the controller.
- Insert the safety key into the launch controller and push down hard and this should light the LED indicator.
- Do the most dramatic countdown “10, 9, 8…3, 2, 1”
- While holding the key down and having the LED light red, press the launch button on the controller until LIFTOFF.
Retrieval
After the rocket lifts off and descents we needs to also follow the necessary steps:
- Remove the safety key from the controller.
- Find the rocket and turn off camera.
- Take off the nozzle and retrieve the SSD card.
- Take the rocket back to the families to keep and detach the camera.
We were moving alternatively with two stations set up in line with each other and we were taking doing one launch at a time, alternatively.
I was the first mentor to kick things of with a very exciting kid. We went through the steps, set up near the launch button, and I started a countdown, “10, 9, 8, 7, 6, 5, 4, 3, 2, 1, Launch! …Launch?
Unfortunately, it did not go as smoothly as I had planned even with my mental notes and checklist. After an emergency delay of 10 seconds, in case the rocket decided to cooperate and lift off, which never happened so it was safe to say something had gone wrong. And sure enough it was a very important detail I had not foreseen: the igniter clips for the launch controller needs to be clipped properly and not be in contact with each other. They were touching each other instead of being clipped separately to the two igniter wires, creating a short circuit. This prevented the electrical current from heating the igniter, so the rocket motor never ignited.
After fixing this mistake we got to relaunch and it soared into the sky!